Guardian of Minerva (The Giant Owl) Boss Guide
Last updated: 2026-07-04
The Guardian of Minerva — literally named "The Giant Owl" in the quest log — isn't just the first boss you'll encounter. It's the day-one progression gate that unlocks the rest of the early game. Killing it and offering a Guardian's Eye on the altar unlocks the Carpenter's Workshop, Blacksmith, Altar L2, Empty House L2, Material Storage L2, and three Feathered armor pieces. Until it's dead, your settlement stays tiny.
The Giant Owl quest appears at your altar the moment you first interact with it. The quest is immediately available; the fight is NOT. Gear up first — this is "build toward this fight," not "do it now."
What killing the Owl unlocks
Confirmed from the in-game quest reward panel:
- Carpenter's Workshop — required to upgrade every other building (the external workbench is the upgrade UI for the whole settlement)
- Blacksmith — required for smelting and metal gear
- Material Storage - Level 2
- Empty House - Level 2
- Altar - Level 2 (enables teleportation between L2 altars)
- Logistics Tent — as of patch 0.25.1_7 (June 1, 2026), the Logistics Tent is now an Owl reward (previously dropped from Pyzifax). This is the building that enables auto-routing between buildings AND repeatable work orders. Huge automation unlock arriving much earlier in progression.
- New Leatherworker recipes: Feathered Hood, Feathered Armor, Feathered Boots
- Reward recipes: Feathered Effigy and Cooked Scorpion Meat
That's why the fight matters more than its mid-game appearance suggests — the Owl IS the tutorial boss, but the tutorial is "all of basic civilization plus full automation."
On this page
Boss overview
- Biome: Plains / Forest border
- Tier: Early game — usually the first boss most players engage
- Phases: two-phase fight, with a storm/lightning mechanic appearing in the second half
We're being conservative with HP and phase-trigger percentages until we can verify them in our own playthrough. Romestead is in Early Access and some guide sites cite numbers that don't match the live patch.
How to find and trigger the fight
The in-game quest text spells out the trigger:
"You have been asked to slay the Giant Owl that circles above. Once this is done, take one of its eyes and offer it upon an altar. The altar you can make yourself with the help of a Workbench. As for the Owl, it must have a nest nearby."
- Scout the Plains/Forest border for a large nest with a giant white egg. It's distinctive — you'll know it when you see it.
- Approach the nest. Make sure your inventory is light (you'll come back to retrieve your corpse if you die).
- Attack the egg to break it. This summons the Guardian.
- After winning the fight, take a Guardian's Eye from the loot and offer it on your altar to complete the quest and trigger the unlocks.
Breaking the egg is the point of no return for that attempt — the owl will not let you retreat far. Don't bash the egg unless you're ready to fight in your current gear.
Cheese strategy: kite the Owl to Automatic Scorpios
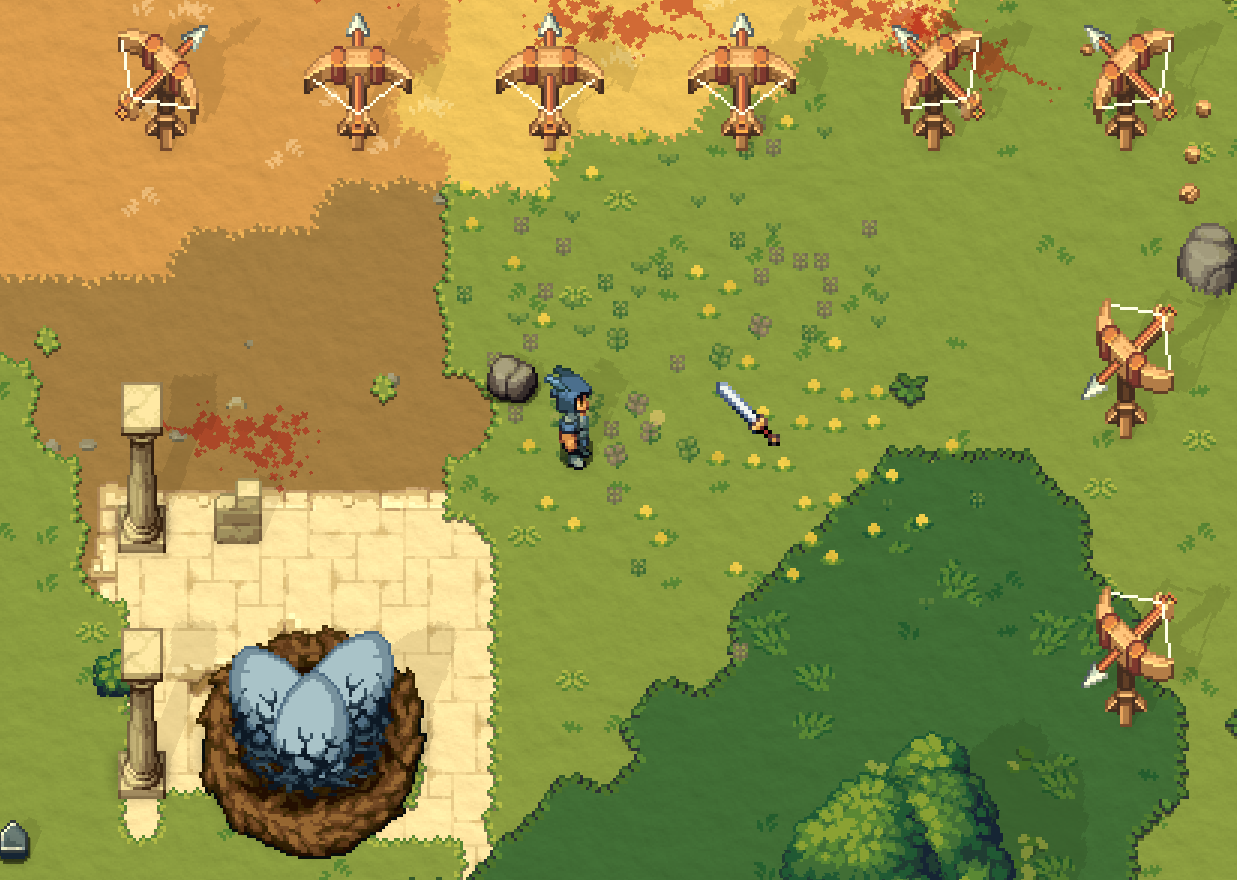
The most reliable strategy isn't melee skill — it's positioning. Build a cluster of Automatic Scorpio turrets near the Owl's nest, then break the egg to summon the fight. The Scorpios auto-target and shred the Owl while you stand back. Brian's playtest with this strategy was a clean, no-hit kill.
- Confirmed working count: 8 Scorpios. Brian executed the fight with 8 Scorpios arrayed near the nest and reports the Owl went down without him taking a single hit — the towers did all the work.
- Scorpio cost: 1 wood log each. So 8 Scorpios = 8 logs total. Extremely cheap.
- Flint Arrow recipe: 1 wooden stick + 1 flint shard = 25 arrows. The Scorpios fire these.
- Placement: arrange the cluster within firing range of the nest area but offset from where the Owl will land. Two arcs of 4 Scorpios each (one each side) works well; a single tight cluster also works.
- Stock arrows generously before triggering — the Scorpios consume arrows fast in a sustained kill. A few stacks of Flint Arrows should be more than enough.
- Bonus: Vulcan has a blessing that unlocks Automatic Scorpio Level 3 for stronger turrets — worth courting if you plan to farm the nest for Feathered armor materials. Scorpios are also your best night-raid defense; see the Raid Defense guide.
Recommended gear
General-purpose advice (we'll lock in specifics after our own playthrough):
- Armor: Best armor set you can craft — leather at minimum, copper if available.
- Melee: A reach weapon (spear/Hasta) is more forgiving than a short sword against the owl's wing sweeps.
- Ranged option: Bow with a full quiver, or a magic scroll if you went Scholar. Useful when the boss takes to the air.
- Consumables: Stack healing foods. Bring stamina-restoring food too — you'll dodge a lot.
Phase 1 strategy
The Guardian's standard attacks are wing-based melee plus occasional aerial moves. Romestead's universal combat rule applies: every attack has a windup, dash-dodge through the windup, punish during recovery.
- Don't full-commit to combos. Short attacks then dodge — overextending gets you clipped.
- Use ranged when it flies. Bow or scroll while it's airborne.
- A storm/lightning mechanic kicks in at some point. Stay mobile when you see the cue — standing still during the storm gets you hit.
Phase 2: the storm
The owl transitions into a more aggressive phase in the back half of the fight, with lightning playing a bigger role.
- Keep moving. Lightning hits where you were — constant motion breaks the targeting.
- Heal in safe windows. Don't drink potions during melee exchanges; wait for recovery gaps.
- If you die: you'll respawn at your bedroll. The boss resets to full HP on re-engagement, so retreat-regear-return rather than mashing retry.
Drops & Feathered armor
Confirmed drops from the Guardian:
- Guardian's Talon (often searched as the Talon of Minerva) — tagged as a Material, with the description "A skilled crafter could make some powerful equipment with this." Used to craft Feathered-tier gear at the appropriate workshop.
- Feathers (the Guardian's Feather) — bulk drop reported, used for Feathered-tier armor pieces.
- Guardian's Eye — the component you offer on the altar to complete the quest; also reported for high-tier gear.
Clearing the Owl also unlocks the Feathered Effigy recipe — a craftable effigy/decoration made from the fight's drops — alongside the Cooked Scorpion Meat recipe. So the kill pays out in three ways: the crafting materials above, the full Feathered armor set, and these reward recipes.
The Feathered tier shows up across multiple items — we've confirmed a Feathered Bow exists in the equipment menu, and there's also a related Camillus armor set (Headpiece / Robes / Sandals) tied to higher-end loot. Bring the drops to your Carpenter and Leatherworker for crafting. The Feathered set is a meaningful upgrade over leather and serves as a bridge into the Bronze tier and beyond.
Farming the nest
Wiki and player reports suggest the nest can be reused — after killing the Guardian, the nest eventually respawns a new egg, letting you farm feathers/talons for a full Feathered set (useful in co-op). We'll confirm respawn timing once we've farmed it ourselves.
The Guardian's lightning phase is meaningfully easier with two players — one player draws aggro while the other deals ranged damage from outside the storm.